I worked on machine quilting my Sheep of the Month quilt today. I bought this kit from Laura's Home. It is wool appliqué on a cotton backing that I stabilized with Presto Sheer (Sue Spargo).
I had planned on quilting a different design in each block that coordinated with the month, i.e. snowflakes for January, hearts for February etc. However the background quilting doesn't show up that well anyway and the blocks were a little puckery, so to be safe I just quilted a swirly design in all of them. I felt I had more control and could take care of the puckers easier.
I did some quilting in the wool pieces so I had to change thread color quite a bit. Thank heavens for my supply of DMC 50 weight thread which I have in oodles of colors! I bought these at the Denver Quilt Show a few years ago. It was an investment because thread is not cheap, but I use it ALL the time in many ways, not just machine quilting. It's great for hand appliqué and piecing too, and machine appliqué if you're into that.
August's block. The teeny birds are buttons!
September's block. I had to use some of my Ireland wool in this quilt just for fun. The umbrella is made from wool I bought in Ireland.
July's block.
May's block.
And of course I had to use Irish wool in the shamrock for March's block!
I also spent some time cleaning up my sewing room today, which included sorting through my supply of machine quilting books. I had them in three different places and decided I wanted them all together. I also had several pages of quilting ideas from magazines that I had torn out. I sorted through them, got rid of those that don't inspire me anymore and put the rest all together in a folder. It was great to see all of these ideas again. I should sit down and look through them every time I begin a quilt!
Friday, January 24, 2014
Thursday, January 23, 2014
The Inbox Jaunt
A friend of mine told me about The Inbox Jaunt, a blog by Lori Kennedy from Minnesota. Every Tuesday she posts a free motion machine quilting tutorial and oh my, what amazing fun ideas she has! I could spend hours just looking at the FMQ tutorials! She posts a lot of other fun stuff as well - today she talked about stencils. I know I am going to learn a lot by following her blog!
www.theinboxjaunt.com
In the photo above I decided to try the Swirls and Twirls tutorial she posted on Tuesday. I first drew it out in my sketchbook. It doesn't look that great, but I know I can stitch better than I can draw so I wasn't that worried. I just wanted to get a feel for the direction I would be quilting.
In the photo on the right I was auditioning what I was thinking of doing in the sashing squares of my Sheep of the Month quilt, which I started quilting today.
Here is my version of Swirls and Twirls stitched out on my practice "sandwich". I can definitely stitch better than I can draw - thankfully! This is such a fun pattern and SOOOO easy, when you follow her step by step directions in her tutorial. I encourage you to go check her blog and give these a try. SO fun.
You can see I started small and got a little bigger. I actually did that on purpose :) - just to see how it looks extending past the one inch lines a bit.
Here is the other design stitched in the sashing squares of the sheep quilt. I like it! It is a design that I haven't tried before. That is one thing about quilting seven quilts in a row - I am gaining some confidence and having fun trying new designs!
I will share more of the sheep quilting tomorrow!
Tuesday, January 21, 2014
Megan's Quilt
Today I went to my Monthly Mini class at Hi Fashion. It was great fun but I cannot show you any pictures because these are gifts for my daughters :)
I decided to share another quilt gift I made for my daughter Megan when she graduated from high school in 2007. She wanted yellow and blue, but no floral prints. We somehow made it work with the nice stripe fabric I was able to find and some blues and yellows that read as solids.
My machine quilting and scalloped border are not too bad!
This is a "Puzzle Quilt" because there are 24 blocks but only 12 patterns, yet no two blocks look the same! Each block has a "twin", meaning it's made from the same pattern, but the fabric placement makes the block look completely different. It is really fun to look at it and figure out which two blocks are made from the same pattern.
It's fun looking back at old photos and remembering these quilts I've made and given away. Some I have pictures of and can't remember who I gave them to! I recommend taking a picture of the quilt WITH the person you give it to, then you'll remember :)
Keep on working on those UFOs!
Monday, January 20, 2014
Numbers Four and Five!
I finished the two baby quilts that I started in the Pinterest Party class last Friday! I did not use batting and did minimal machine quilting. For the green one the backing is this incredibly soft green and brown polka dot minkie fabric. It gives the whole quilt a wonderful feel.
I only used fabrics that I already had, I didn't have to purchase anything for these two quilts. A couple of people in class asked where I got the flannel and I honestly can't remember. It might have been, and probably was, when Hi Fashion Fabrics downsized their store a few years ago and had a BIG sale!
To keep the two layers together I just free motion stitched a little spiral in the center of each circle.
Lorraine, at Hi Fashion, talked me into putting an actual binding on these quilts. I thought about doing a pillow case, right sides together and top stitch sort of finish, but I am glad I took the time to do the binding. It gives it a great finished look.
Here they are after binding and machine washing! I really love the way they feel without the batting, very soft and very usable.
The edges ragged out just like they are supposed to! It gives them a little more softness, texture and interest. The blue polka dot fabric in the outer circle is also the backing for this white quilt.
These will be gifts for someone at some time! They will keep some little baby snuggly and warm!
On to number six! My plan next is to finish my Sheep of the Month quilt, which is also pinned and ready to go!
Sunday, January 19, 2014
Flash Back
I am still working on those two baby quilts that I started in the Pinterest Party class on Friday. Actually one is done and I'm sewing the binding on the other. I want to wash them first though before I post pictures. Hopefully the raggy edges do what they're supposed to!
I thought I would share a photo of a quilt I made about 12 years ago for a challenge in the Co West Quilt Guild. I believe it was called "Black and White and Red All Over". You could use any black and white fabric and only the red piece of fabric in our challenge packet. All the threads and everything had to be black, white or red. They made a big deal about NO gray!
I was pretty adventurous, making up my own pattern for hand appliqué, putting piping by the binding (black and white stripe) etc. My son, who was drumming for the high school marching band at the time posed for the hand photo, which my husband helped me enlarge and I traced for that pattern. The drum I actually just drew! This was back in my "no fear, try anything" days! I need to get a little of my adventure back and design some more quilts. They may not be perfect, but they're definitely unique! Which is pretty much how we are supposed to be, right?
Saturday, January 18, 2014
Third Done in 2014!
I finished the Mountain Blossoms quilt! I have now finished three projects so far in 2014! This one was almost done too, but it still counts!
I started this wall hanging in a class taught by Laura Pedge on hand piecing. We used a method of stamping the pattern on the back of the pieces so you had an exact line to follow with your hand piecing. I enjoyed making this quilt, but I think hand piecing is probably "not my thing". I love hand appliqué and would like to try more hand quilting, but I think I will stick with machine piecing :)
The very center of the block is hand pieced. The little curly cues are hand embroidered and the color dots are wool, appliquéd down with Valdani thread.
In quilting the blocks I tried to follow the curly cue design of the embroidery in the background and a little bit in the hand pieced portion of the block as well. I was happy with the result.
The backing of the wall hanging is the same dark blue print as the outer border I used the dark blue thread in the bobbin and a little bit of it popped up (even though I lowered the upper tension on my machine quite a bit) on the light background of the blocks. It doesn't show too badly - not enough to rip it out anyway, but next time I will follow my friend's suggestion and use the lighter color in the bobbin too, so I don't have that problem.
You cannot see the border design on this busy print fabric - which is OK! But it gave me a chance to practice a free motion flower design which was fun. You can barely make out a flower in this border picture. The Magnifico thread has a bit of a sheen to it which I like.
The whole wall hanging was free motion quilted. I didn't mark anything. I'm not very good at marking, or following markings. With all of this practice I'm starting to get better at free motion quilting. I'm enjoying it more too so that's a bonus.
I hope you are having a wonderful weekend!!
Friday, January 17, 2014
Pinterest Party
Every other month at Hi Fashion this year, they are having a "Pinterest Party" where Heather will teach a pattern, bring snacks, and share other ideas she found on Pinterest.
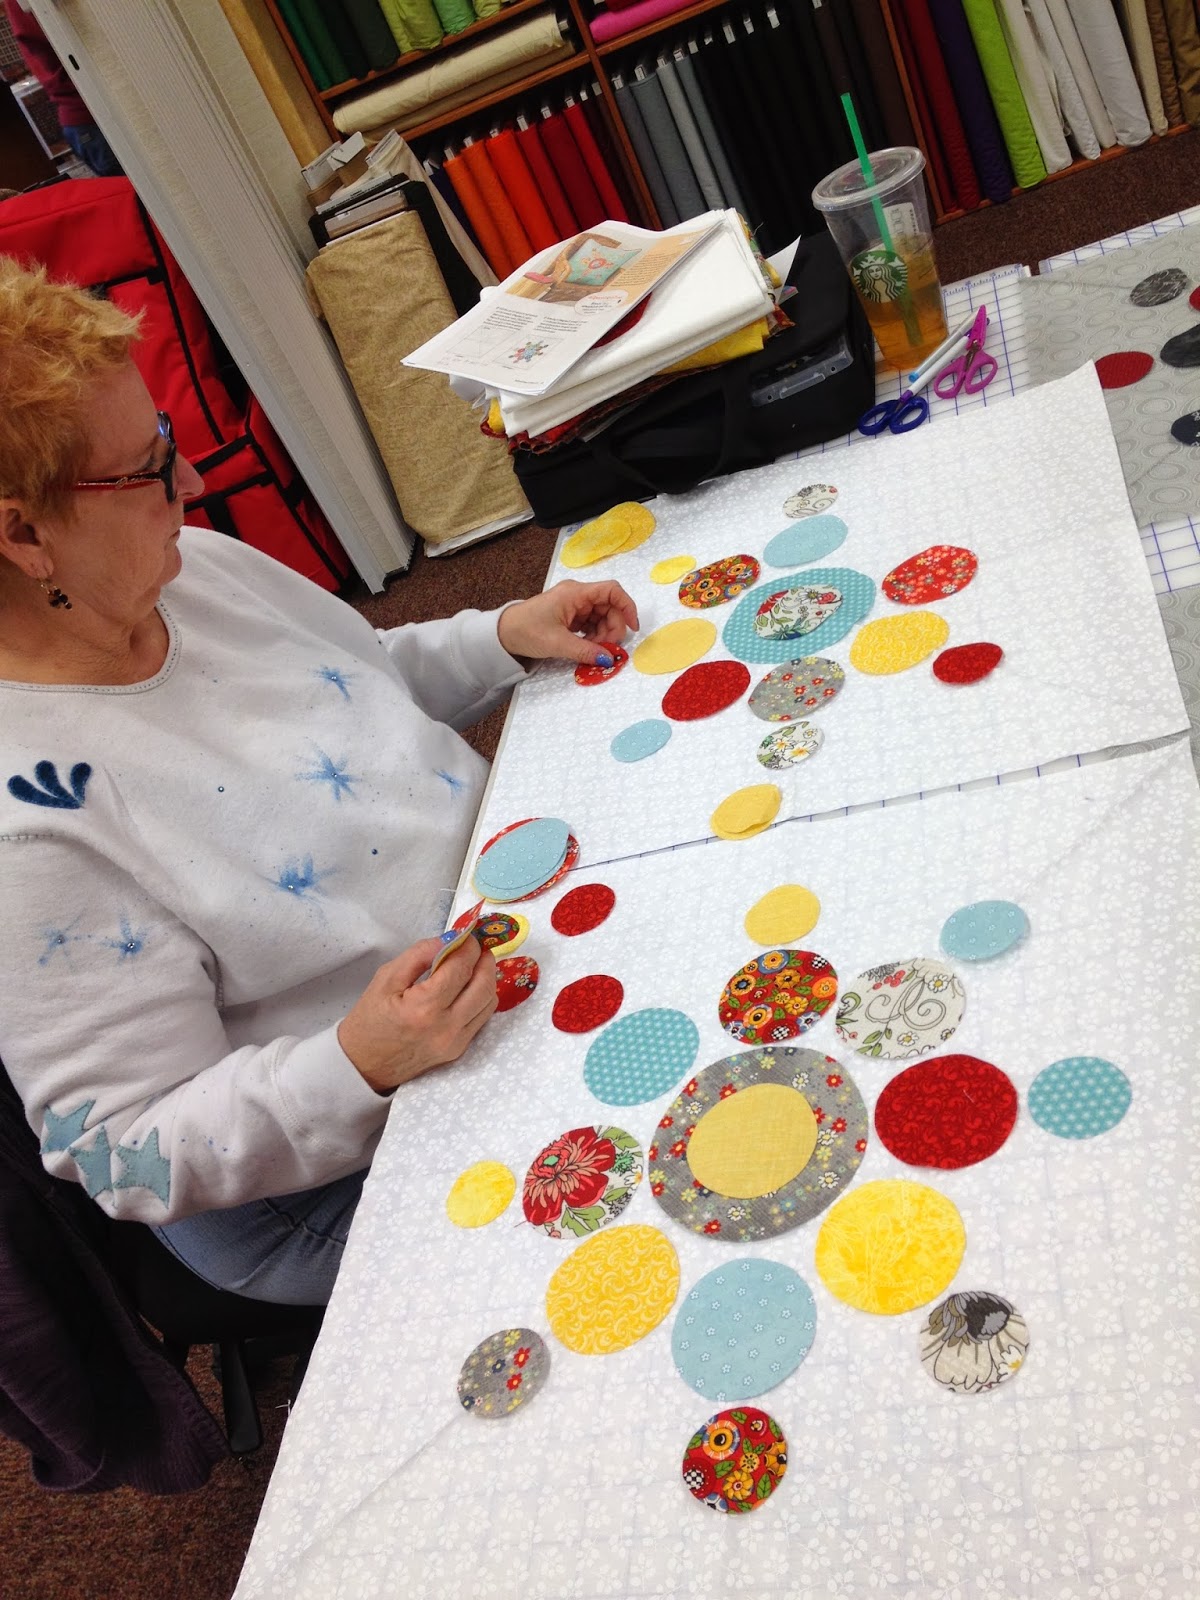
Today was the first one and it was really a LOT of fun! The pattern this month was Bubble Up, shown in the picture at the right.
The first half hour she showed us how to use Pinterest, which was great for me because I have only explored it a little bit.
For snacks she brought a cheesy chicken dip, found on Pinterest of course, and a veggie tray, using a red pepper as the ranch dip bowl.
She also brought cupcakes from Baker's Boutique because it is Toni's (a class member) birthday today. Everything was yummy!
It's always fun to see what different fabrics everyone uses and how different their quilts are going to look.
Basically, you cut out circles and sew them on the background leaving a quarter inch or so around the edge. When you wash it, the edges fray to give it that "rag quilt" sort of look.
I did not want to make a big quilt and I wanted to use fabric I already had, so I went through my flannel stash and just arranged fun flannel circles on a flannel background and put together two baby quilt tops. Here is one of them. I will post better pictures when I get them done and washed so you can see the frayed edges better.
Another class member, Tracy, didn't follow the pattern exactly either and is putting hers together this way. I really like her swirls with different sized circles in the red, white and blue fabric!
Here is my second baby quilt top. I am thinking of not putting batting in them, just backing the other one with flannel and this one with minkie and they will be almost more like a receiving blanket. I am going to try it! Wish me luck. I will have to do some light "quilting" to keep the two layers together, but probably not much.
Uh oh, now I have two more projects to finish... Oh well, I will have two gifts when I am done!
Subscribe to:
Posts (Atom)